Fried Chicken Livers Recipe – Crispy, Tender, and Flavor-Packed
Golden, crisp, and full of rich flavor, fried chicken livers are the kind of comfort food that feels both nostalgic and satisfying. They’re quick to make, budget-friendly, and surprisingly versatile. If you’ve never cooked them before, don’t worry—this simple method keeps them tender inside while achieving a shatteringly crisp crust.
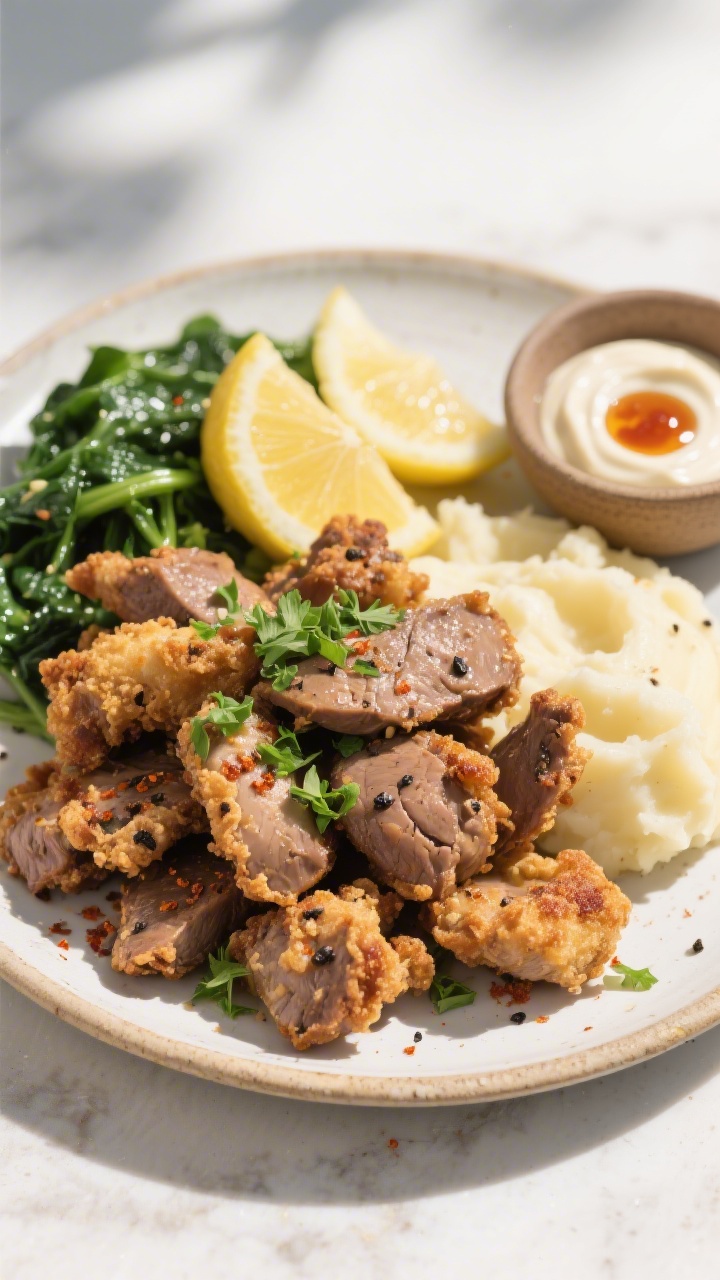
Serve them with a squeeze of lemon, a creamy dipping sauce, or alongside mashed potatoes and greens. Once you get the hang of it, this recipe will become a go-to for weeknights and gatherings alike.
Why This Recipe Works
This recipe leans on a few key techniques that guarantee great texture and flavor. A quick soak in milk or buttermilk helps tame any strong, metallic taste and keeps the livers tender.
A seasoned flour coating creates a crisp, deeply golden crust that sticks well and won’t fall off in the pan. Finally, a hot skillet and the right oil make sure the outside crisps fast while the inside stays juicy. It’s simple cooking with smart steps that make all the difference.
Shopping List
- 1 pound chicken livers, cleaned and trimmed
- 1 cup buttermilk or whole milk (for soaking)
- 1 cup all-purpose flour
- 1/2 cup cornmeal (optional but great for extra crunch)
- 1 teaspoon kosher salt, plus more to finish
- 1/2 teaspoon black pepper
- 1 teaspoon garlic powder
- 1 teaspoon onion powder
- 1/2 teaspoon smoked paprika (or sweet paprika)
- 1/4 teaspoon cayenne pepper (optional, for heat)
- Neutral oil for frying (peanut, canola, or vegetable oil)
- Lemon wedges, for serving
- Fresh parsley (optional, for garnish)
- Hot sauce, honey, or dipping sauce (optional)
Step-by-Step Instructions
- Clean the livers: Rinse the chicken livers under cool water and pat them very dry with paper towels.
Trim off any visible connective tissue or green spots. Cut large pieces in half so they cook evenly.
- Soak for tenderness: Place the livers in a bowl and cover with buttermilk or milk. Let them soak for 20–30 minutes in the fridge.
This mellows the flavor and helps keep the texture soft.
- Prep the coating: In a shallow dish, combine flour, cornmeal (if using), salt, black pepper, garlic powder, onion powder, paprika, and cayenne. Stir well so the seasoning is evenly distributed.
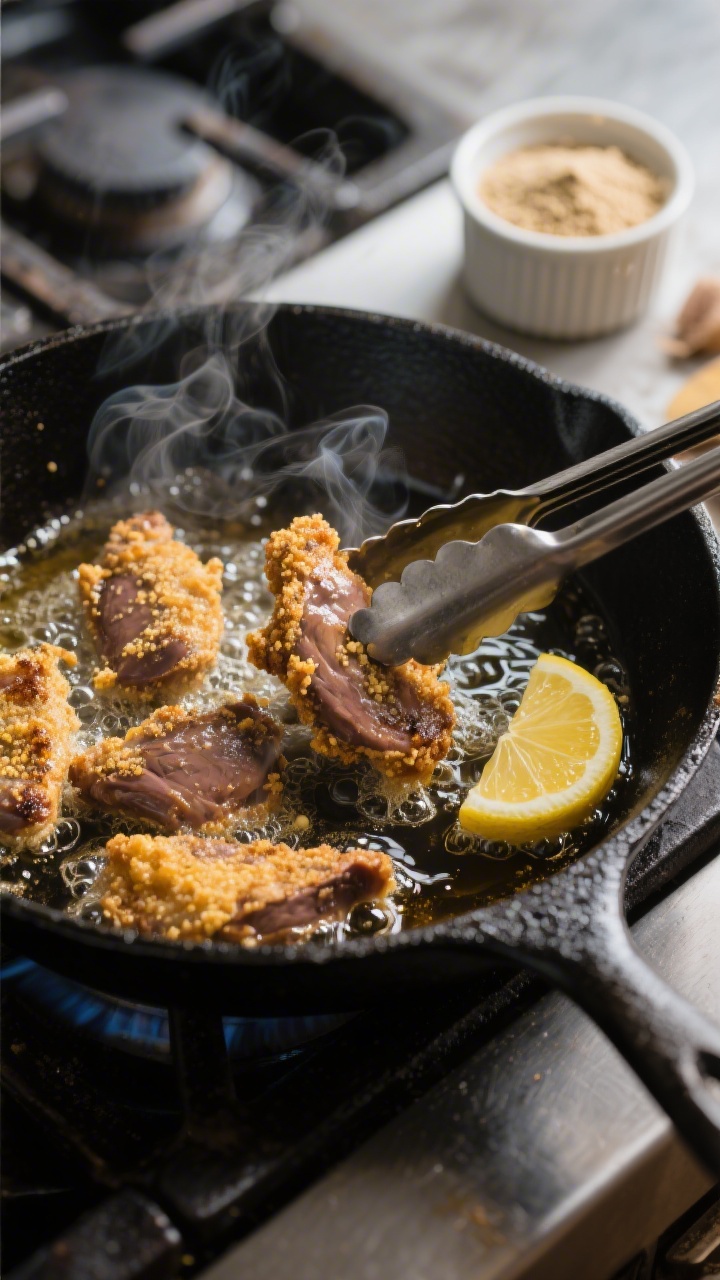
- Heat the oil: Pour 1/2 inch of oil into a large, heavy skillet (cast iron is ideal). Heat over medium-high until it reaches about 350°F (175°C).
If you don’t have a thermometer, a pinch of flour should sizzle on contact.
- Drain and dredge: Remove the livers from the milk and let excess drip off. Coat each piece thoroughly in the flour mixture, pressing lightly so the crust adheres. Place dredged pieces on a wire rack for a few minutes to set.
- Fry in batches: Carefully add livers to the hot oil without crowding the pan.
Fry for 2–3 minutes per side, turning once, until deeply golden brown. The interior should be just cooked through but still tender.
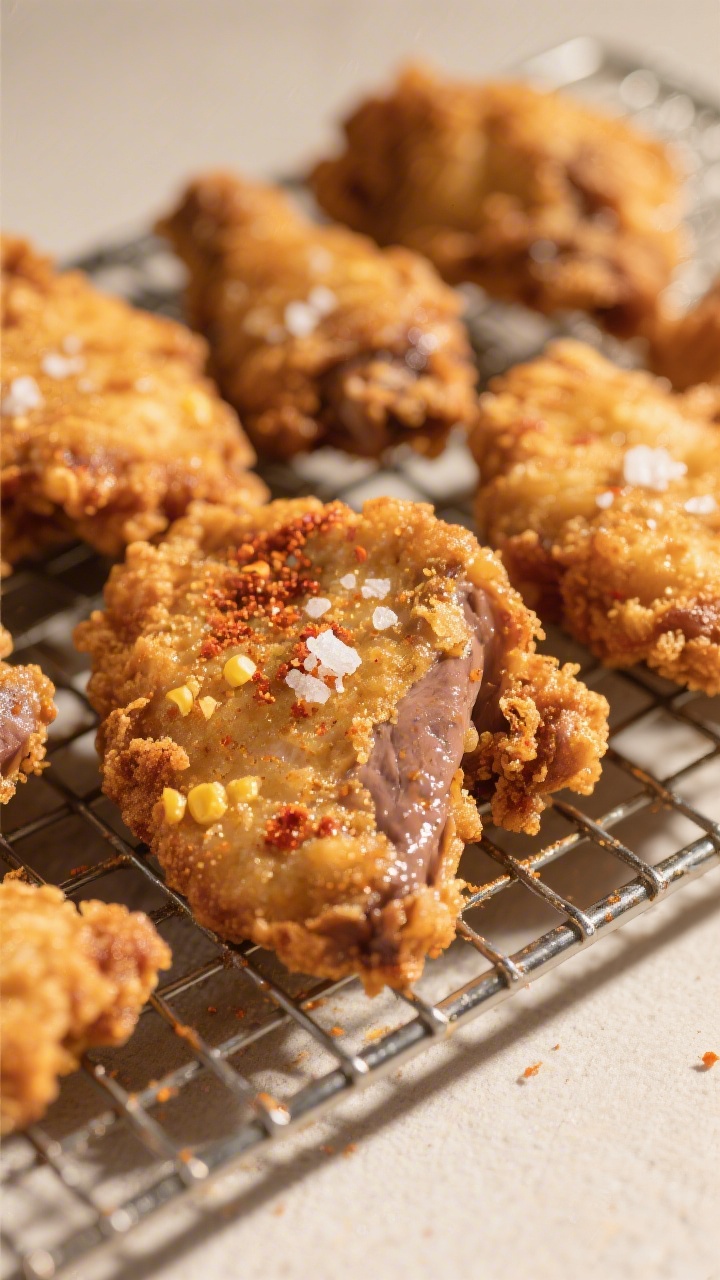
- Rest and season: Transfer to a clean wire rack or paper towel–lined plate. Immediately sprinkle with a pinch of salt to brighten the flavor.
- Serve hot: Plate with lemon wedges, a handful of chopped parsley, and your favorite sauce.
These are best eaten right away, while the crust is crisp.
Storage Instructions
Fried chicken livers taste best fresh. If you have leftovers, let them cool completely, then store in an airtight container in the fridge for up to 2 days. Reheat in a 375°F (190°C) oven or air fryer for 6–10 minutes to restore some crispness.
Avoid microwaving—they’ll turn rubbery and lose their crunch. If you want to prep ahead, you can soak and dredge the livers, then refrigerate uncooked (covered) for up to 12 hours and fry just before serving.
Why This is Good for You
Chicken livers are a nutrient-dense food. They’re packed with iron, which supports energy levels, and vitamin A for vision and immune health.
They’re also rich in B vitamins, especially B12 and folate, and provide high-quality protein. While this fried version is an indulgence, pairing the livers with a fresh salad, steamed greens, or roasted vegetables adds balance and keeps the meal satisfying without going overboard.
Common Mistakes to Avoid
- Skipping the soak: Soaking in milk or buttermilk softens the flavor and improves texture. It’s a small step with a big payoff.
- Wet livers before dredging: Excess moisture prevents the coating from sticking.
Pat them dry after soaking.
- Oil too cool or too hot: Cool oil makes the crust greasy; overly hot oil burns the outside. Aim for 350°F and adjust the heat as needed.
- Crowding the pan: Too many pieces drop the oil temperature and lead to soggy crusts. Fry in batches for even cooking.
- Overcooking: Livers cook fast.
Pull them when they’re just done—opaque and firm but still tender inside.
- Under-seasoning: Season the flour and add a final pinch of salt after frying to make the flavors pop.
Alternatives
- Gluten-free: Use a blend of rice flour and fine cornmeal or a gluten-free all-purpose flour for the coating.
- Air fryer method: Lightly oil dredged livers and air fry at 380°F (193°C) for 8–12 minutes, flipping halfway. They won’t be identical to deep-fried, but they’ll be crispy and lighter.
- Spice swaps: Try Cajun seasoning, berbere, curry powder, or a lemon pepper blend for a different vibe.
- Dipping sauces: Serve with honey hot sauce, garlic aioli, ranch, or a tangy mustard sauce.
- Healthier pan-sear: Dust lightly in seasoned flour and cook in a thin film of oil, then finish with a squeeze of lemon and fresh herbs.
- Onions and gravy: Fry sliced onions in the pan drippings, add a knob of butter and a spoonful of flour, then whisk in chicken stock for a quick gravy.
FAQ
How do I know when chicken livers are done?
They’re ready when the crust is golden brown and the interior is just opaque with a hint of pink at most. They should feel firm but still springy.
Overcooking makes them dry and chalky.
Do I have to soak the livers in milk?
No, but it helps a lot with flavor and tenderness. If you don’t have milk, use buttermilk or even a quick rinse with cold water followed by thorough drying.
What oil is best for frying?
Use a neutral, high-smoke-point oil like peanut, canola, or vegetable oil. Avoid olive oil here—it can smoke and add unwanted flavors.
Can I use frozen chicken livers?
Yes, but thaw them completely in the refrigerator and drain well.
Pat them very dry before soaking and dredging to ensure the coating sticks.
Why does my coating fall off?
Usually it’s from excess moisture or moving the pieces too soon. Dry the livers well, press the coating on firmly, let it set for a few minutes, and avoid flipping until the crust is golden.
Are chicken livers safe to eat slightly pink?
They should be cooked to a safe internal temperature, but a slight blush is common when they’re just done. The key is that they’re not raw or bloody and the juices run clear.
What can I serve with fried chicken livers?
Great sides include mashed potatoes, coleslaw, grits, cornbread, sautéed greens, or a simple salad with a bright vinaigrette.
Don’t forget lemon wedges and hot sauce.
Can I make these spicy?
Absolutely. Increase the cayenne, add chili powder, or toss the fried livers in a hot honey glaze for sweet heat.
How do I keep them crispy?
Drain on a wire rack instead of paper towels, and keep batches warm in a 250°F (120°C) oven while you finish frying. Serve immediately for the best crunch.
Final Thoughts
Fried chicken livers are simple, satisfying, and full of character.
With a brief soak, a well-seasoned coating, and hot oil, you’ll get a crisp exterior and a tender, flavorful center every time. Keep the steps straightforward, don’t rush the fry, and finish with a hit of lemon and a sprinkle of salt. Whether you’re new to cooking livers or grew up on them, this recipe delivers that perfect mix of comfort and crunch.
Ingredients
Method
- Clean the livers: Rinse the chicken livers under cool water and pat them very dry with paper towels. Trim off any visible connective tissue or green spots. Cut large pieces in half so they cook evenly.
- Soak for tenderness: Place the livers in a bowl and cover with buttermilk or milk. Let them soak for 20–30 minutes in the fridge. This mellows the flavor and helps keep the texture soft.
- Prep the coating: In a shallow dish, combine flour, cornmeal (if using), salt, black pepper, garlic powder, onion powder, paprika, and cayenne. Stir well so the seasoning is evenly distributed.
- Heat the oil: Pour 1/2 inch of oil into a large, heavy skillet (cast iron is ideal). Heat over medium-high until it reaches about 350°F (175°C). If you don’t have a thermometer, a pinch of flour should sizzle on contact.
- Drain and dredge: Remove the livers from the milk and let excess drip off. Coat each piece thoroughly in the flour mixture, pressing lightly so the crust adheres. Place dredged pieces on a wire rack for a few minutes to set.
- Fry in batches: Carefully add livers to the hot oil without crowding the pan. Fry for 2–3 minutes per side, turning once, until deeply golden brown. The interior should be just cooked through but still tender.
- Rest and season: Transfer to a clean wire rack or paper towel–lined plate. Immediately sprinkle with a pinch of salt to brighten the flavor.
- Serve hot: Plate with lemon wedges, a handful of chopped parsley, and your favorite sauce. These are best eaten right away, while the crust is crisp.
Printable Recipe Card
Want just the essential recipe details without scrolling through the article? Get our printable recipe card with just the ingredients and instructions.

Olivia is a food enthusiast who loves creating simple, delicious recipes for everyday cooking. She shares easy meal ideas, comforting dishes, and kitchen tips to help home cooks enjoy flavorful meals with confidence.